Traefik - proxy development server with self-signed SSL certificate
You want to check how (or if) your application works with SSL encryption without exposing it to the Internet? Use a self-signed SSL certificate with the Traefik proxy server inside the intranet (or other LAN with restricted access).
TLDR; Clone this repo and adjust content of traefik.toml file https://github.com/jmarceli/traefik-self-signed-ssl-proxy
Start
Traefik is becoming more and more popular thanks to its configuration simplicity and rich features available out of the box. Here is how it can be used to ensure self-signed SSL certificate for selected application server.
Overview
Things to check before starting:
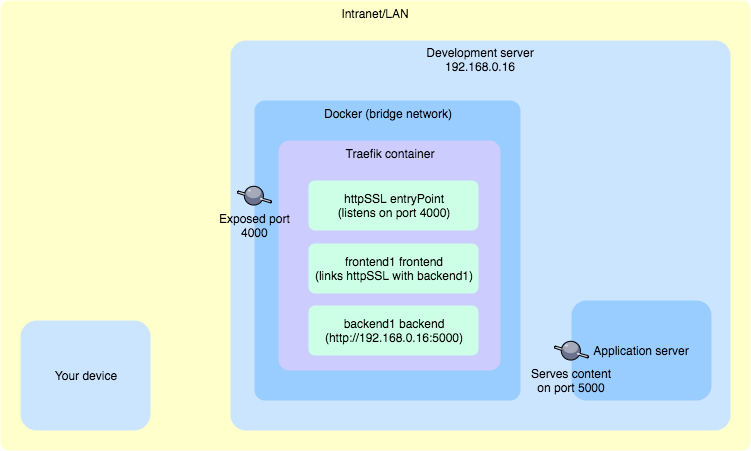
- Your device - should have access to Development server using a custom domain name e.g. my.test, you can set it using the /etc/hosts file (on Unix systems), dnsmasq or directly in the network router, if you have access to its configuration (if you can't do that please read #Tips section to adjust your traefik.toml TLS configuration)
- Development server - if necessary, adjust system firewall configuration and open the required ports (ports 4000 and 8080 should be available for Intranet/LAN connections)
- Application server - make sure it works and is available from Development server on port 5000
Request to my.test:4000 made from Your device is supposed to go through the following path:
- access Development server (via some domain resolution mechanism e.g. /etc/hosts on Your device)
- go through opened 4000 port
- Traefik Docker container should handle that request thanks to the exposed 4000 port
- Traefik httpSSL entryPoint should be set to 4000 port and handle the request
- Traefik frontend1 should "redirect" request to backend1
- Traefik backend1 should respond with a content from Application server
File structure
Here is the final files structure you should generate by following the next steps.
./
./certs/cert.crt
./crets/cert.key
./traefik.toml
./docker-compose.yml
Self-signed certificate files
You will need a .key and .crt files. They can be generated for self-signed certificates using the openssl. If you don't have it already, please check on Google (brew install openssl for Mac OS X with Homebrew packages manager). With the openssl ready to use execute:
openssl req -x509 -nodes -days 365 -newkey rsa:2048 -keyout cert.key -out cert.crtThe only important question while running the openssl command is Common Name (e.g. server FQDN or YOUR name):. It should match the domain name of your server e.g. *.test or my.test (or any other that you can point to your server), wildcards (*) are allowed.
After preparing the certificate files, you must change their access rights.
chmod 644 cert.crt
chmod 600 cert.key
It's done, now you may proceed to the next step.
Traefik configuration traefik.toml
Most Traefik configurations will be placed inside the traefik.toml file. Here is the final result.
debug = true
logLevel = "DEBUG"
defaultEntryPoints = ["httpSSL"]

[web]
address = ":8080"

[entryPoints]
  [entryPoints.httpSSL]
  address = ":4000"
    [entryPoints.httpSSL.tls]

[file]

[backends]
  [backends.backend1]
    [backends.backend1.servers]
      [backends.backend1.servers.server0]
        url = "http://192.168.0.16:5000"

[frontends]
  [frontends.frontend1]
  entryPoints = ["httpSSL"]
  backend = "backend1"

[[tls]]
  entryPoints = ["httpSSL"]
  [tls.certificate]
    certFile = "/certs/cert.crt"
    keyFile = "/certs/cert.key"
Useful information:
- debug and logLevel - It should be self-explanatory
- defaultEntryPoints - Specifies that by default Traefik server will expose extrypoint named httpSSL (it can be any string, just be consistent if you want to change it)
- [web] - This section might be omitted, it will provide administrative/diagnostic panel on the selected 8080 port
- [entryPoints] - Defines default entrypoint httpSSL and assings port 4000 to it. It also ensures tls encryption (TLS is "safer" SSL)
- [file] - This one is tricky, because it does not look as important as it is, thanks to that section Traefik uses traefik.toml file as a backend definitions provider
- [backends] - All available backends names (which is only one backend1 in this example) with http://192.168.0.16:5000 as a proxy target (http://192.168.0.16:5000 is an IP address of a running Application server)
- [frontends] - Frontends configuration, where frontend1 is the name (which can be changed at any time), entryPoints and backend keys link entry point with a backend for given frontend, rule tells Traefik which domains it should handle with that frontend
- [[tls]] - Assign generated cert and key files to the selected entryPoint (which is httpSSL in this case)
It's Docker time
With traefik.toml in place it's time to go to the Docker configuration. The simplest (at least for me) solution is to write the docker-compose.yml file. Here's how it can look.
version: "3"

services:
  traefik:
    image: traefik:1.7.0
    networks:
      - public
    ports:
      - 4000:4000
      - 8080:8080
    volumes:
      - ./traefik.toml:/traefik.toml
      - ./certs/:/certs/
      - /var/run/docker.sock:/var/run/docker.sock

networks:
  public:
    driver: bridge
Let's start from the beginning:
- version - Specifies the syntax of the Docker configuration used
- services - A list of Docker containers to create
- traefik - The only service to create
- image - Image for traefik service creation (1.7.0 is the current stable version at the time of writing)
- network - The name of the network which will be used does not matter, as long as it uses the bridge driver defined at the end of configuration in networks section
- ports - Exposes 4000 port which will be proxied with SSL and 8080 for debugging and diagnostic
- volumes - Files and folders mounted to the created container, you should be familiar with all of them except /var/run/docker.sock which allows traefik container to use Docker API
Show time
When everything is in place, it's easy to shine :) Execute:
docker-compose upVisit http://192.168.0.16:8080 to check the configuration. Here is how it may look like.
Then open https://my.test:4000 to admire the results of your hard work.
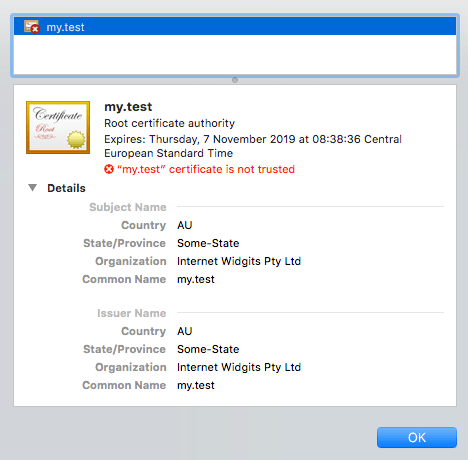
You can verify if certificate works by clicking on "Not Secure" info in Google Chrome address bar. Details should match those provided during cert generation.
Tips
You can't set a custom domain name for your development server and you need to use it's IP address
Use following entryPoints configuration:
[entryPoints]
  [entryPoints.httpSSL]
  address = ":4000"
    [entryPoints.httpSSL.tls]
    [entryPoints.httpSSL.tls.defaultCertificate]
      certFile = "/certs/cert.crt"
      keyFile = "/certs/cert.key"
Thanks to that step you will use your own certificate (generated in #Self-signed certificate files step) as a default one.
Application server address 192.168.0.16
It doesn't have to be your Development server IP visible on LAN. It can be also an internal IP visible from Docker which is usally something like 172.17.0.1. You should be able to check that using ifconfig (look for docker0 interface), in case you are using Docker for Mac you may also use host.docker.internal see the docs.
Troubleshooting
Check the output after executing the docker-compose up command.
If you want to restart the created container with the new/changed configuration inside traefik.toml file, press Ctrl-c, and then execute docker-compose down && docker-compose up to make sure that old container has been properly destroyed.
502 Bad gateway instead of your requested/proxied content probably means that you have made a simple error in the traefik.toml configuration. Watch out for typos and renaming (if you choose to change some names).
Start with minimal modifications. Just copy and paste the example content to files and adjust only the URLs. Start it. You will be renaming everything (frontends, backends, entryPoints, containers, networks etc.) later, after the first successful start.
Some explanations regarding the Traefik log messages:
Serving default cert for request: ...- you probably give an incorrect FQDN when generating a self-signed certificate usingopensslError loading new configuration, aborted unable to generate TLS certificate : tls: failed to find any PEM data in certificate input- check the path to your certificate files specified in the traefik.toml file, it is probably icorrect
Be patient and read this guide again... (if necessary)
Why
Because I did not find such an example when I needed it.
After some adjustment, you can use this configuration in production with Let's Encrypt SSL certificate instead of self-signed. I'm going to write something about it later and link it here.
Sources
https://tools.ietf.org/html/rfc7568 - SSLv3 deprecation in favour of TLS 1.2 https://stackoverflow.com/questions/35110146/can-anyone-explain-docker-sock/35110344 - info about docker.sock https://hub.docker.com/_/traefik/ - Traefik Docker image https://docs.traefik.io/ - Traefik Documenation, which should be the most up-to-date source of knowledge https://docs.docker.com/docker-for-mac/networking/#use-cases-and-workarounds - Docker docs

